


D2L Brightspace Frequently Asked Questions
The D2L Homepage
-
Do I have the option of not having course tile images?No. Course title images are enabled by default system wide and cannot be deactivated.
-
Can I select a different image for the course tile and a different image for the course Banner from the D2L image library?No. The course title image will be the same image used for the course banner. It is only possible to select an image from the curated library provided by D2L, or for you to upload a custom image. However, you can still use a widget to create your own banner for your course.
-
Can I create my custom image for the course tile?
Yes. All standard image file types are supported. It is recommend that course images be 2400 x 960 pixels and that they don't contain text. This ensures they can be resized to look good in different contexts and on different devices.
-
I don’t see any courses under My Course on the Home Page when I log in?
If you are enrolled in 50 or more courses, you will not see any courses under My Courses on the Home Page when you log in. You can view your courses by clicking View All Courses under My Courses on the Home Page. When the list of courses are displayed, you can then pin these courses to have them show under My Courses.
-
How do I filter and sort my courses?
Click View All Courses to open up the all courses tool. From here you can access Filter and Sort tools for your classes.
-
What accessibility standards does D2L Brightspace target?D2L Brightspace follows WCAG 2.0 Level AA requirements.
Browsers
-
Which browsers can I use to access D2L Brightspace?
D2L Brightspace supports Firefox, Edge, Safari, and Chrome. Make sure to run the System Check on the D2L Brightspace login page to be sure. You should also allow pop-ups for D2L Brightspace.
You can also use your mobile device, such as an iPad or mobile phone. Please note that you are strongly recommended NOT to use mobile devices to take quizzes in D2L.
Classlist
-
What are the additional roles in Classlist?
A course instructor may add the following special roles in a course:
- Secondary Instructor (NEW)—This is a new piloted role identical to the D2L Instructor role with permission to contribute to course design and student grades; however, this role is not evaluated by students at the conclusion of the semester.
- View_Copy Instructor (NEW)—A role for participants who cannot edit a course or view student data, but who have access to the course content for the purpose of viewing or copying into another course shell including hidden content.
- Non-Edit Instructor—A Non-Edit Instructor has the capabilities for instructor but cannot edit content. This role typically used for Teaching Assistants or similar, since they will be able to grade.
- Non-Grade Instructor—A Non-Grade Instructor has the capabilities for instructor but cannot grade students. This role can add or change content and is typically assigned to course designers.
- Visitor—A Visitor can participate in all course activities except for those that are graded. This role cannot edit content or grade students.
- Special—The Special role is a student role with no access to the email tool within the course.
-
How do I add another participant (student or instructor) to my course?
- From your Course Home page, click Classlist.
- Click Add Participants on the top tool menu of the Classlist page, and click Add existing users.
- Under Add Existing Usersenter the NetID of the user and click on the search magnifier icon.
- Check the box next to the user you want to add and select the role you want to assign to the user.
- Click Enroll Selected Users.
- Click Done.
-
How do I unenroll a participant (student or instructor) from my course?
- From your Course Home page, click Classlist.
- The list of your course participants appears on the screen. Click the checkbox next to the name of the person (or persons) you want to remove.
- Above the classlist, click the Unenroll icon.
- Click Yes on the confirmation window to proceed with removing the participant from the course. (Or click No to cancel the request so that the participant is not removed from the course.)
Note: Students who unenroll from a class will automatically be removed from the course within a few days of unenrolling. Instructors should not have to manually unenroll students from their course if a student says they have dropped the class.
Course Start Date
-
How do I change a course start date for students?
Courses are loaded with the student start date set to the official start date of each Semester or sub-semester (Example: Summer has Maymester, full, first-4, second-4, 8-week, etc.). If students need to have access earlier than this, an instructor can change the start date for their course.
- Click Course Admin in the navigation bar.
- Under the Site Setup section, click Course Offering Information.
- Check the Course has a start date option.
- Enter the date and time when you would like to students to begin their access.
- Click Save to finish.
Discussions
-
Creating Private “Student Journal” Discussion Topics
To create a private discussion topic between the student and instructor, use group-restricted Discussions in D2L Brightspace. You will create groups of 1 member each.
- In the Navigation Bar, click Other.
- From the drop-down menu, click Groups.
- Click New Category.
- Enter a Category Name, such as “Student Journals.”
- Select Enrollment Type:Groups of #.
- In the Number of Usersfield, enter 1.
- Check the Auto-Enroll New Userscheckbox, if there may be more students added to your course.
- Check the Set Up Discussion Areas
- Click Save.
- You will be taken to a second screen to finish the setup of your restricted discussion areas.
- Choose an existing Forum from the drop-down, or click New Forum. You can make a forum titled “Student Journals.”
- After selecting the appropriate forum, click Create and Next.
- You will receive a summary message, confirming how many groups were created and how many Forums and Topics were created. This should match the number of students currently enrolled in your course.
- Click Done.
A discussion topic has been created for each student. Each topic will be restricted to that student and the instructor(s).
Note: If you enroll new students after creating the groups and topics, they will be automatically placed in their own group of 1. However, you will have to manually create and restrict their discussion topic.
Assignments
-
Why am I getting the following message in Turnitin?
If you are receiving the message An originality report cannot be generated because the assignment due date has passed for an Assignment with OriginalityCheck enabled, even after extending the restriction dates for the Assignment folder, the dates for the assignment got passed through to TurnItIn when the Assignment folder was created, and TurnItIn did not get any further changes to dates. Consider making a new Assignment folder for the students to submit.
-
Why can't my students see an Assignment folder I linked to the Table of Contents?
Newly created Assignment folders will default to draft status. If the folder is linked into Content via Existing Activities without changing the default to Published, the folder will carry over the default draft status. Students cannot see it until the instructor sets the Assignment folder status to Published.
-
Can I disable email forwarding?
- Click on your name in the upper-right corner of the screen.
- Click Account Settings.
- Go to the Email tab.
- Disable email forwarding by unchecking "Forward incoming messages to an alternate email account."
- Click the Save button.
-
What is the maximum size limit for emails?
Email messages cannot exceed 2 Megabytes.
-
What is the maximum size limit for attachments?Email attachments must be under 2 Megabytes.
-
Why do I not see the email in my inbox after I click on an email in the notification area?Adjust the filter in your inbox to show messages by course, or to show all messages in the inbox.
-
Why is there an “Error: Not Authorized” message when I access the D2L Brightspace Email tool?Students will be unable to access the D2L Brightspace Email tool while any quiz is still in progress. This is functioning as designed, to reduce the opportunity for inappropriate collaborations during assessments. Once a student has completed this quiz, the D2L Brightspace Email tool can be accessed again without error.
Grades
-
How can I exclude a grade item from final grade?
In the points grading system, a simple checkbox selection in the grade item properties excludes this grade item from the final grade selection.
In the weighted grading system, this checkbox does not exist. One must set the weight of the grade item to "0" in order to exclude it from final grade calculation. To be able to adjust the weight, the category of the grade item must not be set to " Distribute weight evenly across all items " (unless the category's weight is set to "0").
-
How can I hide a grade item that I created until I am ready to release it?
To hide a grade item from students:
- Go to Manage Grades in Grades.
- Click the Grade item you wish to hide from students.
- Go to the Restrictions tab.
- Select Hide this grade item or set a Start Date to release the grade at a future date.
- Click the Save button.
-
How can I hide the Final Calculated Grade column from students?
The Final Calculated Grade is hidden from students by default. It will not appear until you release the final calculated grade to the students.
To release the final calculated grade to students:
- Go to Enter Grades in Grades.
- Click the drop-down arrow next to Final Calculated Grade.
- ClickGrade All.
- Click in the Release Final Calculated Grade column, click the checkbox for all students you wish to release a final grade for.
- Click Save and Close.
-
Why is there a gray exclamation point icon for some of the grade items?The gray exclamation point icon appears when selecting to Grade All for a grade item and indicates that these grade items are dropped automatically from the final grade calculation. The grading option to drop a certain number of lowest grade items is part of the properties of the grades category.
-
How do I name a new column in an Excel gradebook .csv file?The following shows the naming convention for a new grade item column header when created in Excel: Assignment Points Grade <Numeric MaxPoints:10 Weight:10>, where "Assignment" is the actual name of the grade item. Note that simply typing a name in the column header will result in an import error in D2L Brightspace.
-
Why does the gradebook only show a gray box for the grade item and not the grade I put in?In Grades, go to Grades Settings, select Points grade in the Personal Display Options, and click Save.
-
What do I need to do to make sure students can see grades in the grade book?By default, any grade item you create is visible to your students. If you wish to hide a Grade Item, you can either hide or set a date range on the Restrictions tab of the Grade Item.
Import, Export, Copy Components
-
Which components cannot be exported from my course?
Components such as widgets, homepages, and custom navbars do not export. However, they can be transferred with the Copy Components function.
Mobile Devices
-
Which D2L features work on smartphones? Which ones do not?
The following features will work on the smartphone:
- Bookmarks
- Calendar
- Course Content
- Discussions
- Grades
- Announcements
The mobile view shows calendar and events first after you log in. To access all the other tools, tap the tool icon in the top-left corner.
The following features are currently not available on the smartphone:
- Assignments
- Quizzes
Quizzes
-
How do time limits for quizzes work?
Students must start the quiz before the end date and time, but do not have to finish it before the end date and time.
For instance, if they have 45 minutes for a quiz with an end date/time of 11 pm, but they begin at 10:30 pm, they still have the full 45 minutes (until 11:15) before the quiz is late. After the full 45 minutes, they are “late.”
Depending on your selections on the restrictions tab for late submission, remember that D2L will either let them submit as normal; let them submit, but flag as late; or force an auto-submit of previously saved questions.
-
How can my students take a quiz that requires the Respondus LockDown Browser?
Students will access the quiz page through D2L. The quiz page will notify students under Quiz Requirements that “You must use the Respondus LockDown Browser to take this quiz” with a link students can click to download the latest version of Respondus LockDown Browser if they do not already have it installed.
Once the Respondus LockDown Browser is installed, students need to click Launch LockDown Browser on the quiz page and select to open the application in the LockDown Browser when prompted. The Respondus LockDown Browser will then open to the quiz page and allow the student to continue taking the exam from within the LockDown Browser.
-
How can I reset or force-submit a quiz attempt that is labeled in progress?
Resetting a quiz attempt so that a student can retake an assessment and manually forcing the submission of an attempt in progress are two options that are available to instructors in the grading section of a quiz, as illustrated below.
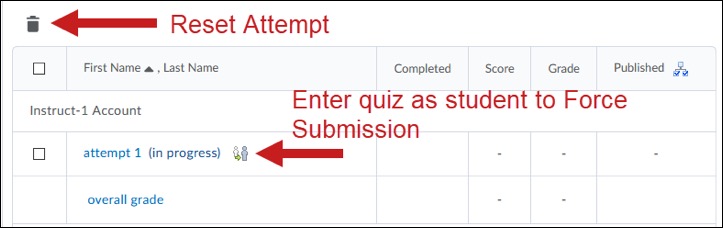
In Quizzes, go to the quiz, click Grade from the drop-down menu next to the quiz title, and locate the attempt(s) to be reset or force-submitted.
-
How do students see the feedback on their quizzes?
There are 2 possible fields for leaving overall feedback on a Quiz: Grade Item Public Comments and Feedback.
- Grade Item Public Comments are visible to the individual student in the gradebook. The word “public” indicates that the comments are visible to the student, not just the instructor.

- Feedback is visible from within the Quizzes tool, not the gradebook. If feedback is left in the Feedback box, the student will receive a comment bubble next to the quiz name in the Quizzes tool in the Submission Views for that quiz:

This overall feedback is separate from any question-level feedback. If you leave any feedback on the individual questions in an attempt, make sure to release the questions in Submission Views for that quiz. If the questions are not visible to students, then the question-level feedback is not visible.
-
Why am I getting an error when importing a large number of questions from the Question Library?One solution is to import 10 or fewer questions at a time. Another solution is to download the questions to Respondus, and then publish them to the quiz in D2L Brightspace.
-
Why are my students’ grades for a Quiz not showing in Grades?You will need to force submit and reset student grade attempts.
Release Conditions
-
How can I extend the availability of a quiz or assignment folder to an individual student?
To extend the availability period of a Quiz or Assignment Folder:
- Go to the Quiz or Assignment
- Go to the Restrictions
- Select Allow selected users special access to this quiz.
- Click Add Users to Special Access
- Change date availability and/or access settings.
- Go down to the Userssection and select the student(s) for whom you are granting a different availability period and/or access settings.
- Click the Add Special Access
- Click Save.
Rubrics
-
How can I associate a rubric I created with a tool?
To associate a rubric:
- The rubric status must be set to Published, and not Draft.
- The Competencies checkbox must remain checked to maintain availability of the rubric for association.
-
How do I use rubrics with Discussions?Rubrics for discussions should always be attached to the Grade Item, not the Discussion Topic, or students will not be able to see the rubric. Furthermore, any feedback/grading done through a rubric in the Discussion Topic will not carry over to the Grade Item and will need to be re-entered.
-
Why can’t I delete a rubric?Once a rubric is set to published status and attached to an item, it cannot be deleted. However, you can set a rubric to archived status; then it will no longer be visible. The Status drop-down is available on the Properties tab of a rubric.
Weblinks
-
I created a weblink through Quicklinks in Content but the website loads as a blank page
Some websites will not open if they are added as a Link in D2L Brightspace. These sites prohibit loading in frames, which is how D2L Brightspace loads links by default.
The Google website is one example. Some browsers give an error message (IE), whereas others (FireFox, Chrome) just load a blank page with no error at all.
The solution is to check Open as External Resource when creating a link, as long as pop-ups are enabled for https://kennesaw.view.usg.edu.


